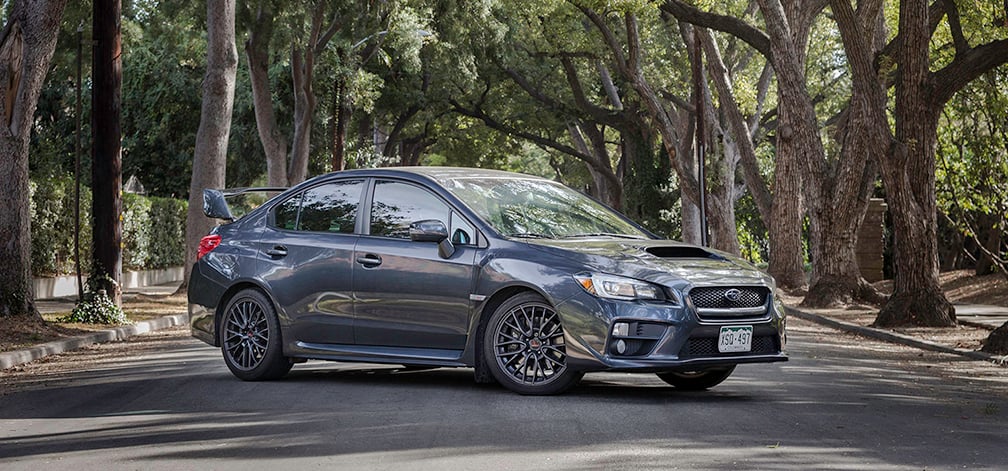
You simply cannot plan your WRX build the same way you could up through model years 2014 for the WRX and 2021 for the STI. The car is fundamentally different than previous generations. The FA20DIT powered WRX is a massive overhaul from what Subaru owners and enthusiasts were used to prior to it's 2015 model year release. On paper, it seems similar - turbocharged, boxer engine, all-wheel-drive, sedan. After that it gets blurry. Aside from a new body design, the engine is now direct injected and features a completely different turbo configuration with a twin scroll unit sitting right underneath the front of the engine with very short header runners leading to the turbine housing. This is a huge contrast to the port fuel injected, single scroll turbo located above and behind the engine with past EJ series engines.
With my personal experience of tuning and modifying direct injected, turbocharged platforms with the Mazdaspeed 3, Mazdaspeed 6, Ford Focus ST, and others I've tuned for customers, I had to test out the waters with the new WRX. I knew it would be a little more intuitive learning and modding experience for myself, as opposed to a die-hard Subi guy that was used to the EJ25.
Considering this is the second year of the FA20DIT WRX, there are already so many things that can be done to this car so having a plan for the build is the first thing I wanted to do before I ever spent a dime. I've done this with many platforms and having worked at a performance retail company, we get to witness other enthusiasts' modding experience all the time. Take my word for it, a plan is way better than no plan. Even if you change the plan in the middle, you have a much better understanding of why and what to do when you had a plan to begin with.
Start By Setting a Goal
The goal can be a somewhat vague picture that sets the plan in motion. With my WRX, I have to figure out what I want from this car. It's going to be a daily driver for the foreseeable future, so reliability is extremely important to me. In other words I’ll be sticking to modifications I know will be safe on the stock block. That isn’t to say I don’t accept the risks of modifying the car, but I will be doing so with the intention of maintaining as much reliability as possible.
My goal for the car is to make as much power as I can reliably on the stock engine. I’ll be aiming for 350 to 375whp. I want the car to perform as well in the corners as it does out of the corners, but I don’t want to sacrifice too much ride quality in the process. I also want it to look as good as it performs.
While I’m not aiming to have the fastest FA20DIT powered WRX in the world, there may come a time in the future where a motor build comes into play and more power will be desired. So, I will also be keeping this in mind as I move forward.
Prioritize Your WRX Parts List
After you’ve established a goal, you can start to prioritize your wish list and order of operations.
For me, my first priority is power. Being at a much higher altitude here in Denver, CO, my car runs much slower than everyone else at or near sea level. In order to reclaim some of that lost power, my first priority is going to be based around the engine.
 But even knowing that I want to start with the engine isn’t good enough. Where in the engine should I start? Since I know that pretty much any power mod I install will require tuning, my first choice needs to address that. I chose the Cobb Tuning Accessport. Not only does this device allow me to make more power immediately, it also opens the door to making more power in the future as well.
A good practice when deciding on what parts to buy, is to look at all the different options out there and determine what differences might exist among them. That will lead to questions that are important to answer before you spend some money. For example, if you know you'll probably end up past 400whp, it would definitely be useful to get an intake with a bigger MAF housing that can be scaled to read the extra air. It doesn't matter that you're not there yet as this intake is fine for a stock turbo. But it allows you the headroom later, instead of having to buy an intake twice.
When making your priority list, you may also want to consider any shortcomings your vehicle might have. In the world of VW, Mazdaspeed, and other DI cars, that shortcoming is the High Pressure Fuel Pump (HPFP). For me and my FA20DIT, it is a rather nasty boost spike. So another high priority modification for me is a boost controller.
Even though power and performance mods are a higher priority for me than suspension and handling mods, that doesn’t mean I haven’t thought about it. I have those prioritized as well.
Once you have a general priority list of what is most important to you, you can begin to assemble your plan.
The Build Plan
A build plan should be a complete map of your projects priorities that will help lead you towards accomplishing the end goals.
A good practice when deciding what parts to buy and when is to look at all the different options and determine what differences exist among them. That will lead to questions that are important to answer before you spend money. For example, if you know you'll probably end up past 400whp, it would definitely be useful to get an intake with a bigger MAF housing that can be scaled to read the extra air. It doesn't matter that you're not there yet as this intake is fine for a stock turbo. But it allows you the headroom later, instead of having to buy an intake twice.
With that said, you need custom tuning in order to run a bigger MAF, unless it's Cobb's Big SF Intake that they make an off-the-shelf map for. If you do need custom tuning, the intake might be best left for the last bolt-on mod before custom tuning so that you can use the off-the-shelf maps until then, instead of needing custom tuning twice.
See what I mean by researching all the options and discovering questions you might not know you should be asking yourself?
For me, I will be going with a 3” intake option on my WRX because of this exact concept. Regardless of whether I do or not get a bigger turbo, it'll allow for better flow from the stock turbo and at the end of the day, I still need to buy an intake anyway.
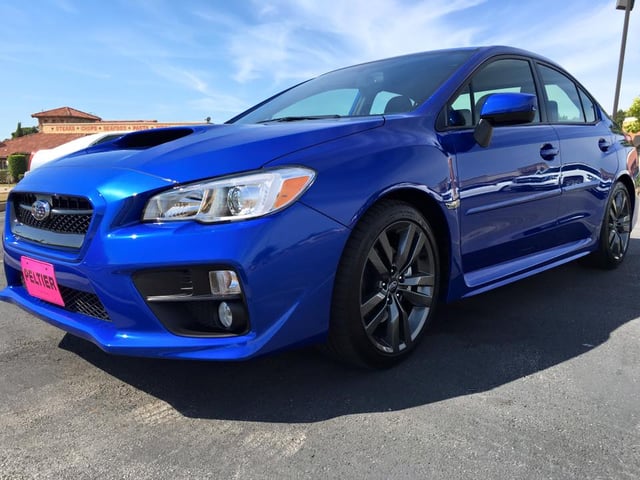
So without further ado, here is my 2016 WRX build plan.
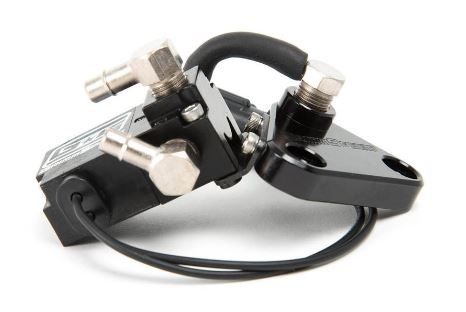
Step 1: Tuning and Problem Areas - AccessPort Tuner and EBCS
I need to be able to tune the car for the upcoming mods. I also know that the WRX tends to suffer from a rather large boost spike, so for step one I’ll be going with a Cobb Tuning Accessport and a GrimmSpeed 3 Port EBCS.

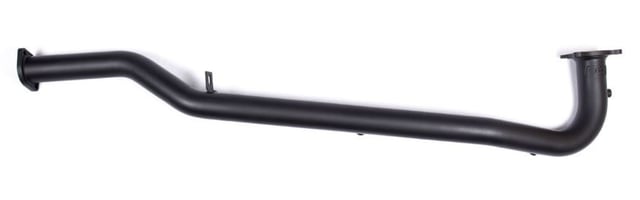
Step 2: More Power - Downpipe/J-Pipe
With what I’ve observed from others who have gone before me, I know that the J-Pipe is the next biggest bump in power. And since I want to maximize my efforts, the GrimmSpeed J-Pipe is going to be the next purchase.
It would typically be at this time that I would also install a cat back exhaust to complete the exhaust post-turbo. However, since I am on a stricter budget at the moment, the stock cat back will have to stay for a bit longer.
Step 3: More Air - Intake System
With the exhaust side opened up, I now want to get the intake side to breathe easier. That means installing an intake. Since I’d like to eventually run a stock style turbo upgrade on my WRX, I would like to go ahead and purchase an intake that I think would work well with that factory frame turbo upgrade. The Cobb Big SF Intake is what I'm going with. 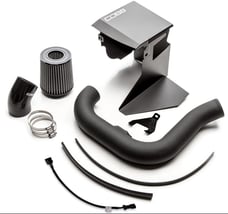
Since I’m going to be working with the intake, this will also be a good time to upgrade the leaky stock bypass valve. After seeing some interesting cases where the replacing it actually gained power because of how much the stock valve leaked while being pressurized, I was sold on upgrading the bypass valve. If you are plagued with the leaky stock valve, this mod will free up some lost horsepower for sure.
Step 4: Cold Air - Top Mount Intercooler
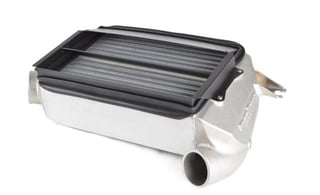 Now that my car is breathing, it's time to make the most out of the air it's pulling through. That is where an upgraded intercooler/aftercooler comes in. There are quite a few options for this and it starts to get more and more difficult to nail down what I want. I like the fact that Killer B’s Aftercooler allows you to keep the factory engine cover, but GrimmSpeeds upgraded top mount intercooler with the addition of some fancy vents helps to force more air through the intercooler and therefore improve the performance even further.
My other option is a front mount intercooler. However, since I don’t plan on going past 400whp with this car, a FMIC may be too much for me. And yes it can help with heat soak, but with the GrimmSpeed’s ram air effect, it may not be enough of a problem to justify going the FMIC route. Plus, I know that GrimmSpeed’s TMIC is more than capable of supporting my power goals and with there not being a turbo hiding underneath the FA20DIT’s top mount location like they do on the EJ’s, the GrimmSpeed TMIC and charge pipe seems to be the clear choice for me.
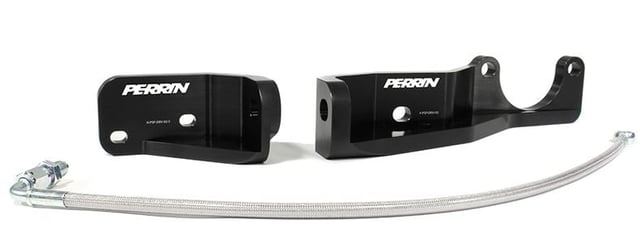
Step 5: Prepping for Power - Pitch Stop Brace, Pitch Stop Mount, Brake Master Cylinder Brace
With the power that this setup is now capable of, we are touching on a couple other factory issues…
The pitch stop bracket on the firewall is failing on stock WRXs. It's even an official Subaru TSB. I’ve seen too many of these fail to ignore this and for that reason, while the intercooler is off, I will also be installing the Perrin Pitch Stop Brace. Out of convenience, I will pick up a Pitch Stop Mount at this time as well.
I would be lying if I told you that I was completely happy with the factory WRX brakes. There is probably nothing I want more than a set of STI Brembos to make for a nice little factory upgrade. The reason I decided to wait is because I want to get the most out of my factory setup first. I don’t necessarily want to replace a perfectly good set of brakes, so by the time I get to this point in my build plan, my brakes will be due for a change anyways, and the cost will effectively be less that way.
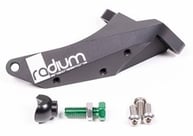 While I’m upgrading the brakes, I’ll also be upgrading the brake lines with a StopTech stainless steel set. For now, I'll do a minor brake mod and fix another factory issue where the master cylinder flexes to much when brake pressure is applied. I’ll be going with the Radium unit.
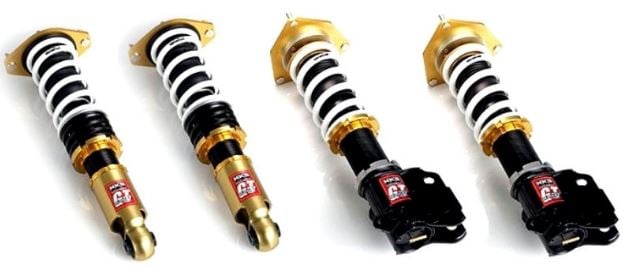
Step 6: The Low Life - Coilovers
First of all, I’m not about the low low life. I like function over form and will be going with a set of coilovers based on their performance rather than their ability to drop my frame to the ground. Because they retain the inverted strut design, I’m heavily leaning towards the HKS Hypermax Coilovers.
I will also be slapping on some new wheels and tires at this time. I know the look I want and while I’m not going into too much detail here, I have a set of 18x9.5” wheels picked out that will be getting wrapped in a nice meaty tire. I don’t want to go too wide on the tire because this is still a street car and I need to stick with my daily driver goal.
Step 7: Chassis Stiffness/Rigidity - Sway Bars, End Links, Control Arms
While it is tempting to get this all at once with the coilovers and wheels, budget dictates that I wait. So I’m dedicating a whole step to sway bars and adjustability. For sway bars, I’ll be going with the Whiteline adjustable rear sway bar along with adjustable end links, though I haven’t fully decided how stiff yet. This isn't a set it and forget it mod though. I'll compare settings and see where I like it. I also haven’t decided if I want a front sway bar yet because I tend to like a car with a little rear end bias.
For adjustability, I’ll be going with some adjustable lower control arms from Whiteline. After all this is installed, I’ll be going to get an alignment to dial it in perfectly and that should take care of my suspension plans.
Just because you set a plan doesn’t mean you have to stick with it perfectly. Goals can change, but if you plan far enough ahead, you can adapt to the changing goals without having to completely reformulate the plan. However, having the plan in place will give you a clearer picture as to where you are going and allow you to make better decisions when you do come to a point where your goals might change.
This post was originally published in October, 2016 but has been updated to reflect current parts and accurate information!
Topics: