
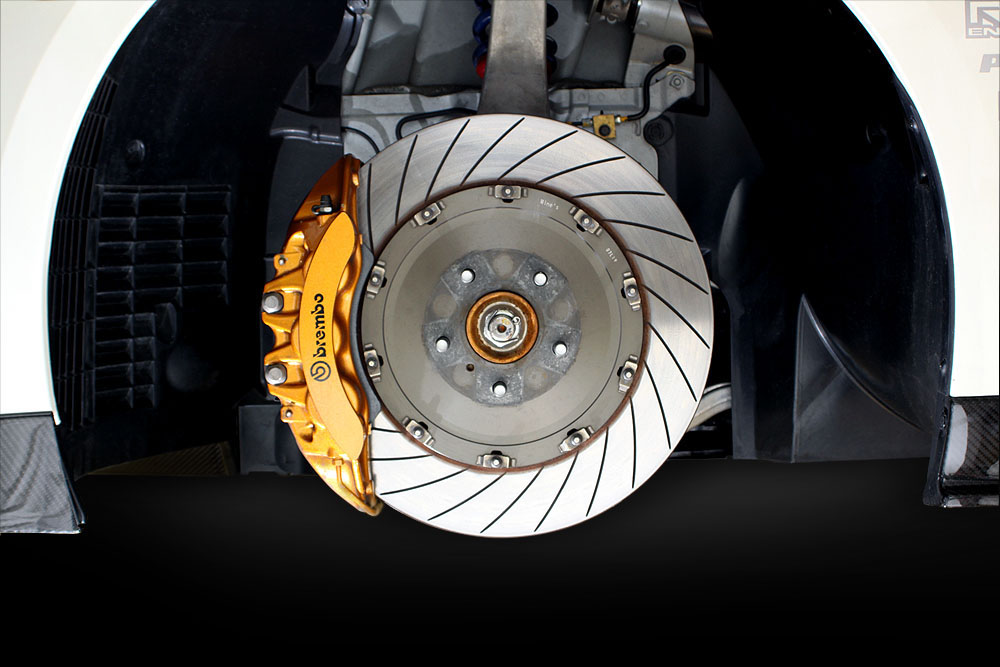
On a turbocharged car, the intake is often sized according to the stock turbo from the factory. It will be designed to dampen noise, and fit with relative ease into a certain area of the engine bay. This comes before performance and this is why upgraded intakes are such a huge benefit to making power on a turbocharged car. Smoother tubing with a high flow filter will reduce restriction and make less work for your turbo. However, sometimes even these upgraded stock replacement intakes are not enough.
 An upgraded stock replacement intake is great for those who are looking for a moderate performance boost. They are often very easy to install and will provide more power while also allowing you to hear the turbo sucking wind. While tunes are recommended, you can often find stock replacement intakes that don’t require a tune since the intake is not big enough to throw off the MAF Transfer Function much, if at all. That isn’t to say you shouldn’t get a tune with a stock sized intake, because you will certainly benefit from having it dialed in properly for the extra air.
Maxed Out:
The first sign that you need a bigger intake is going to come in the form of MAF cut. This is what happens when you max out the voltage on the stock MAF sensor. The stock MAF sensor is calibrated over a 0 to 5 volt range with each voltage representing a given air flow based on the diameter of the intake. As airflow increases, smaller diameter intakes will peg 5 volts much faster than larger intakes because the voltage doesn’t represent as much air flow on the smaller intake as it does on the larger intake.
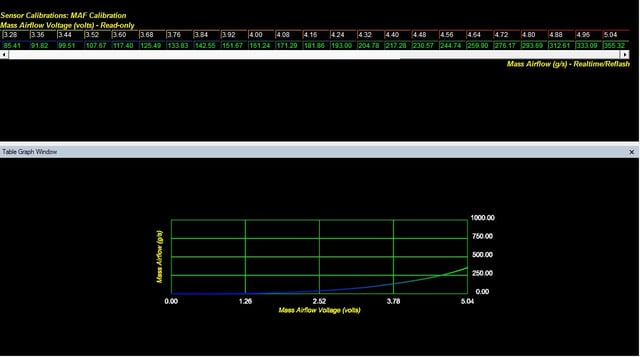
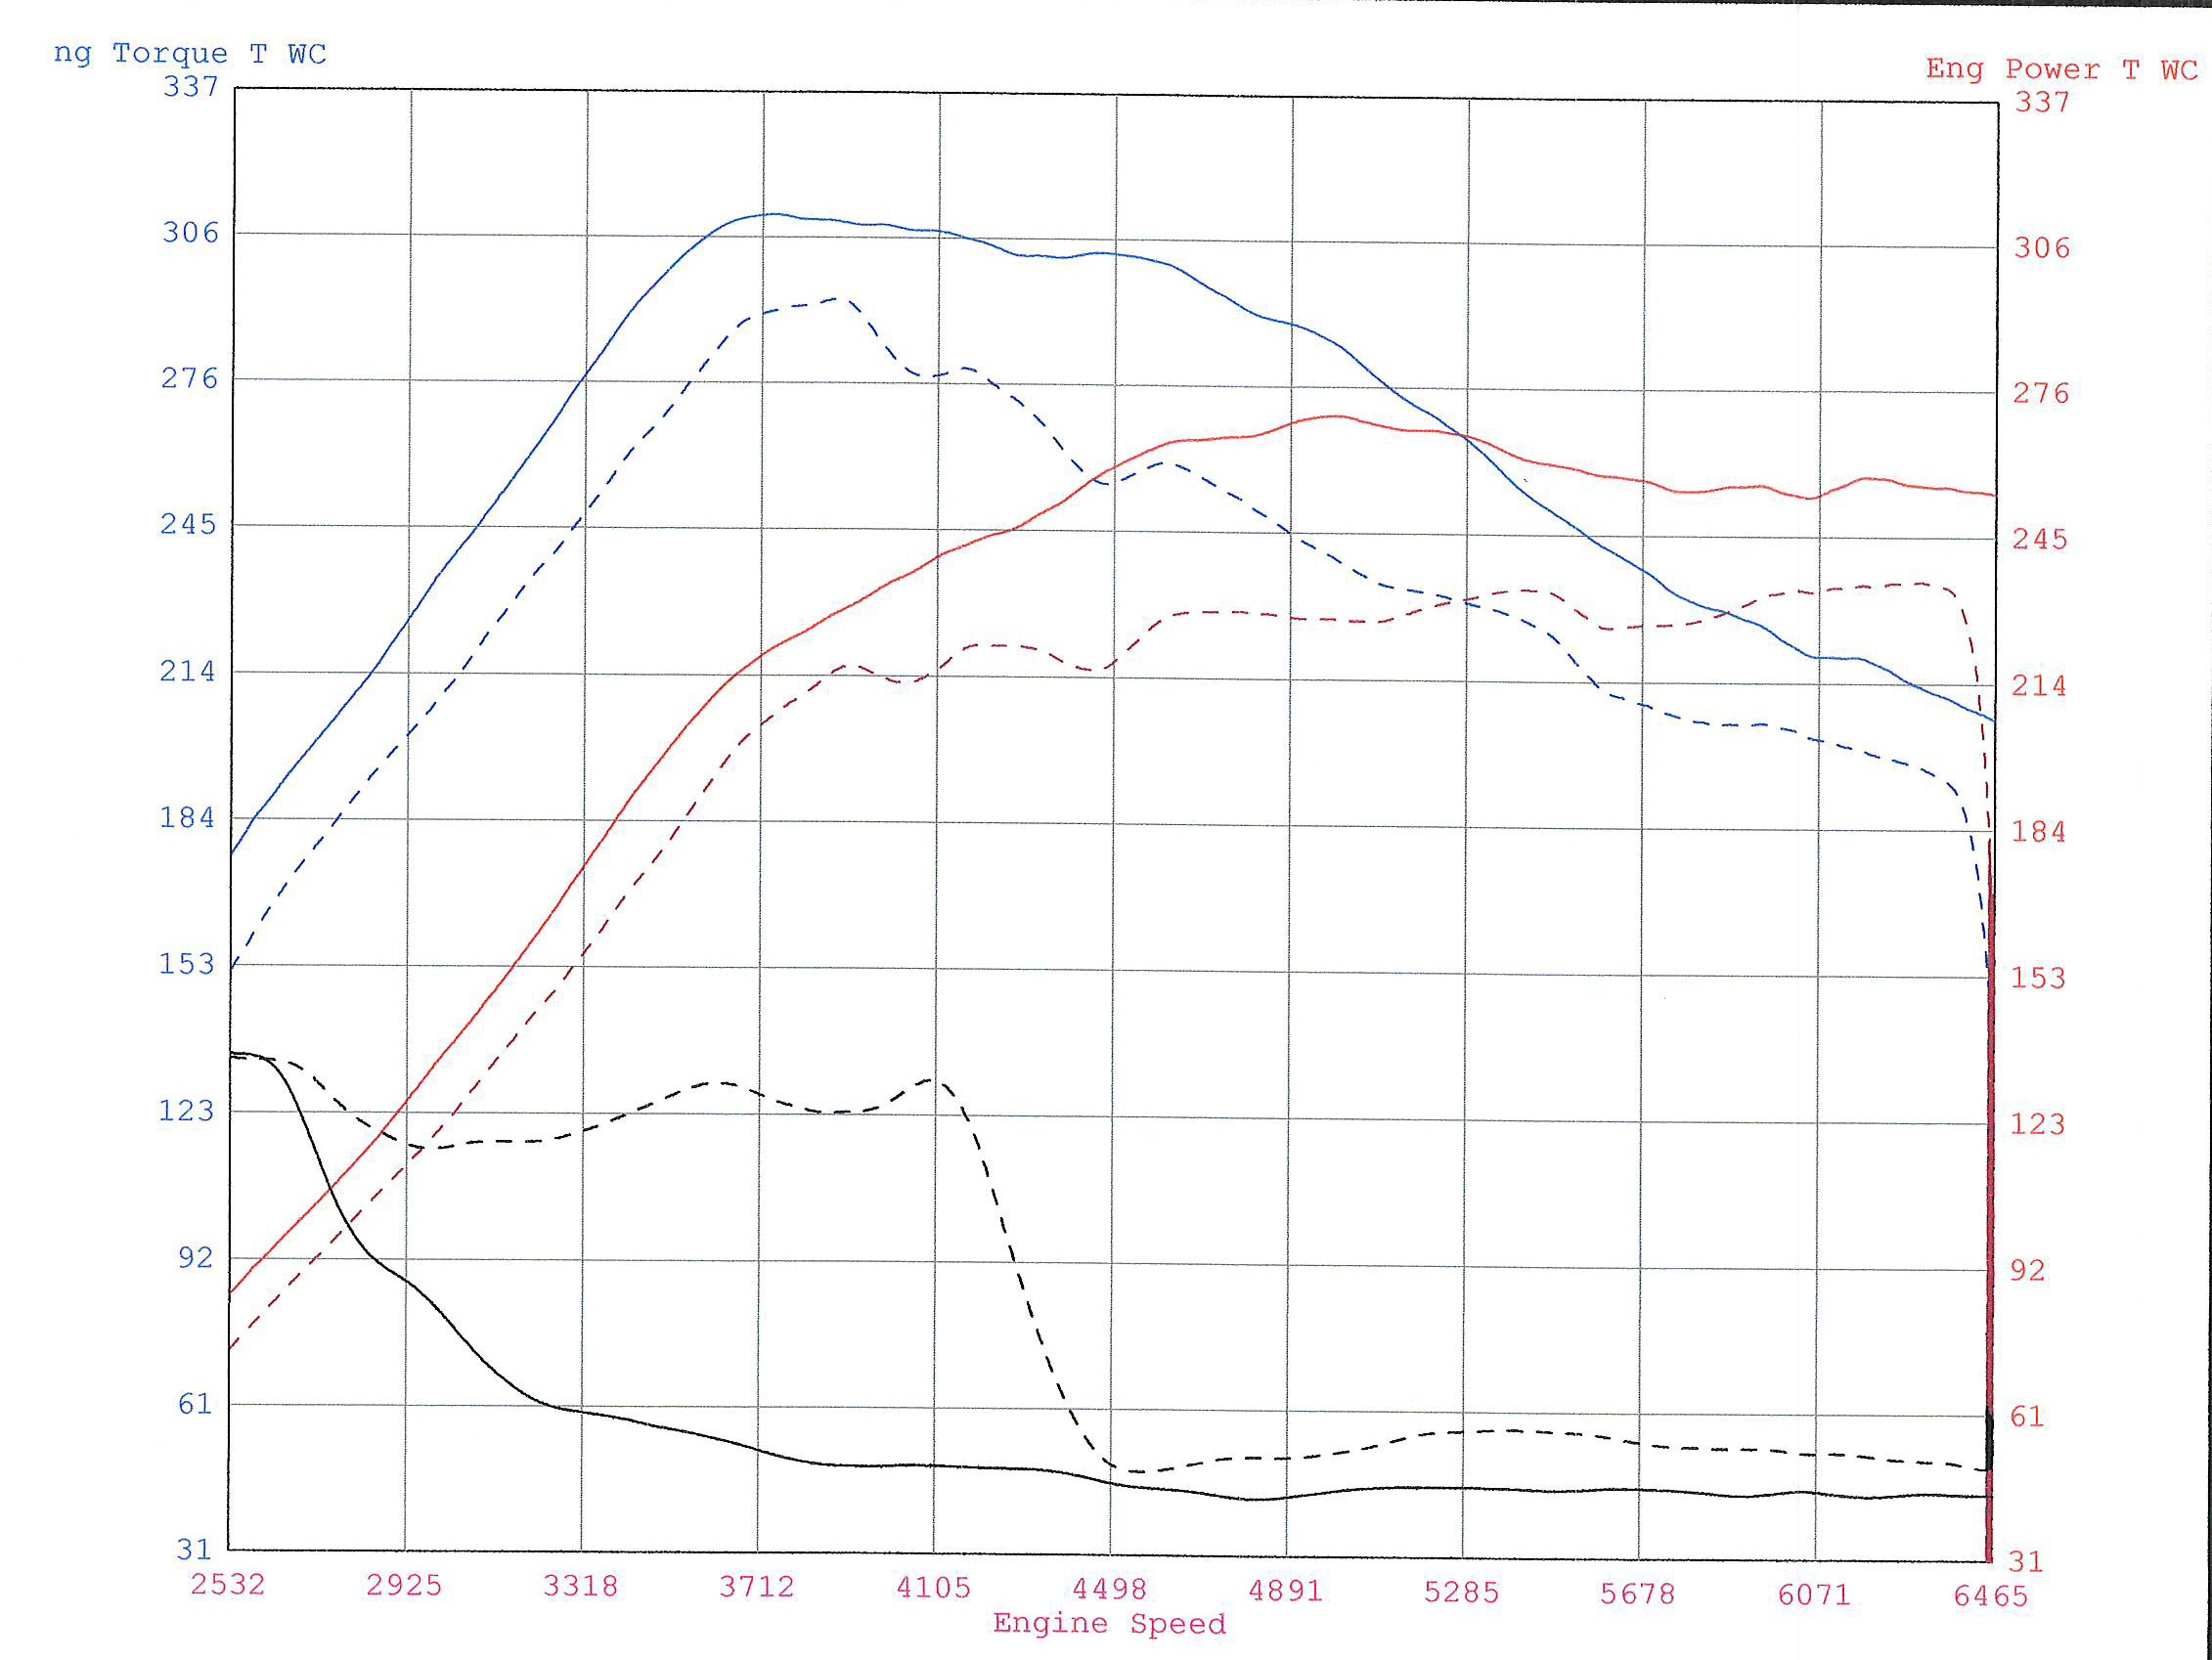
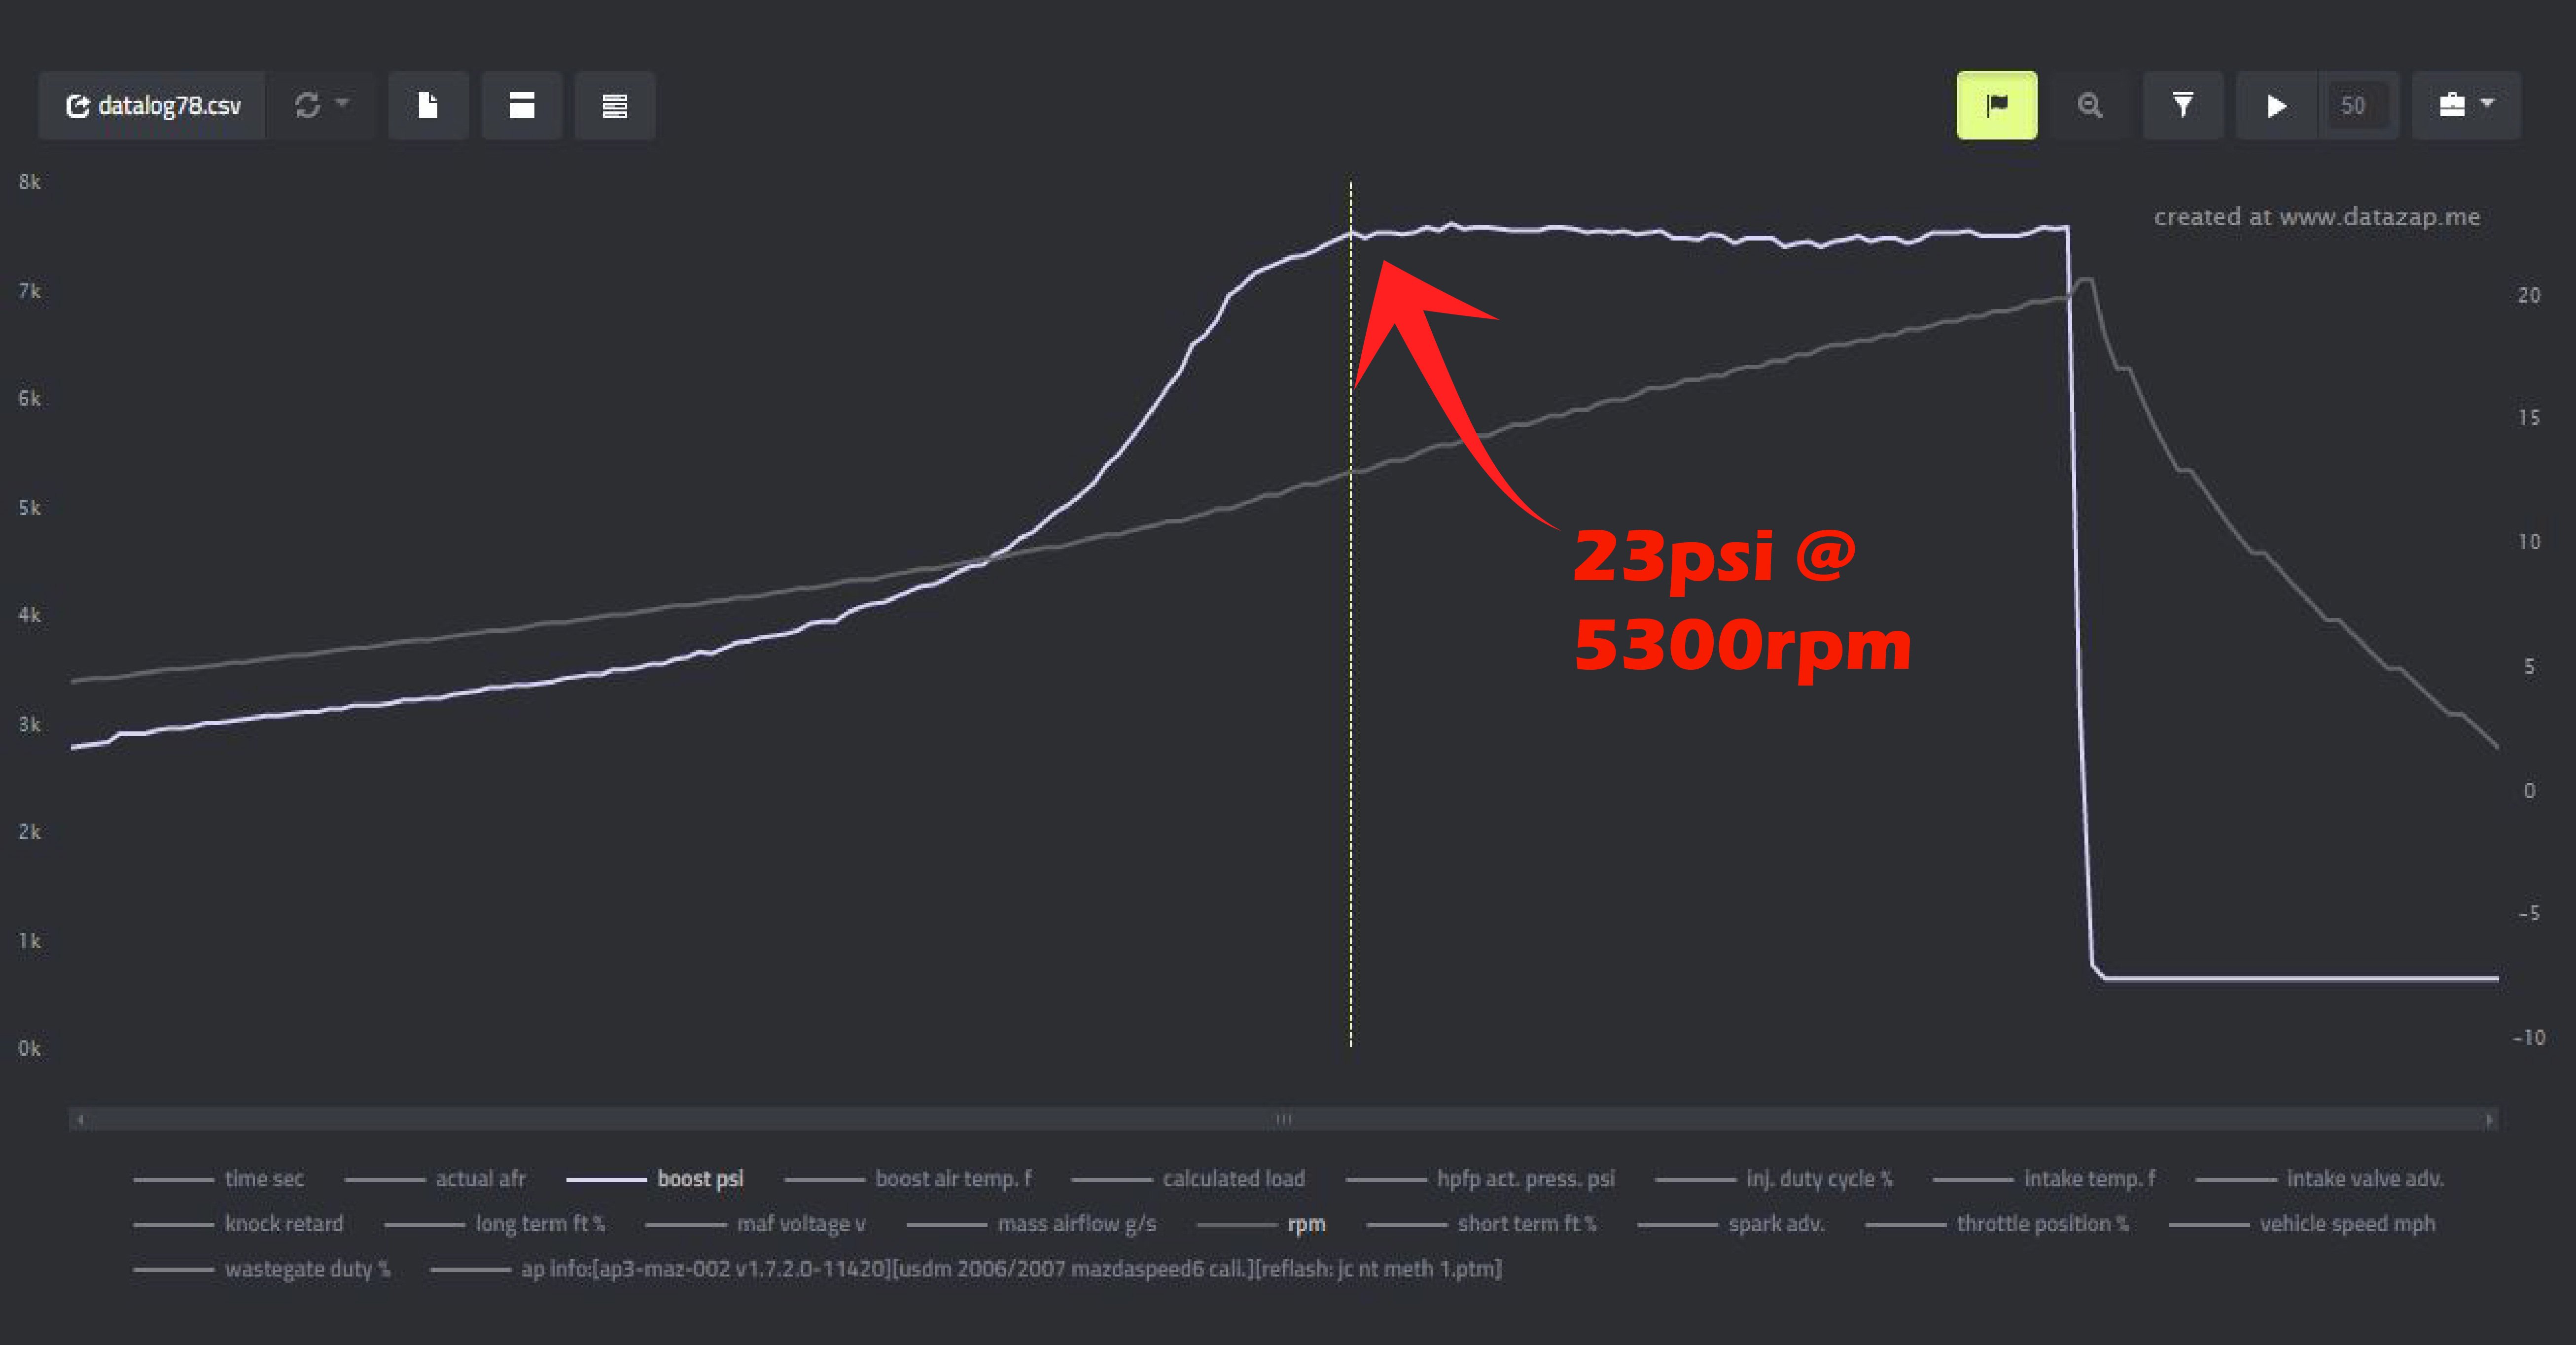
As you can see from this stock MAF Transfer Function on a 2016 WRX, the airflow only hits 355.32g/s and if you are seeing this, you will be maxing out the MAF sensor.
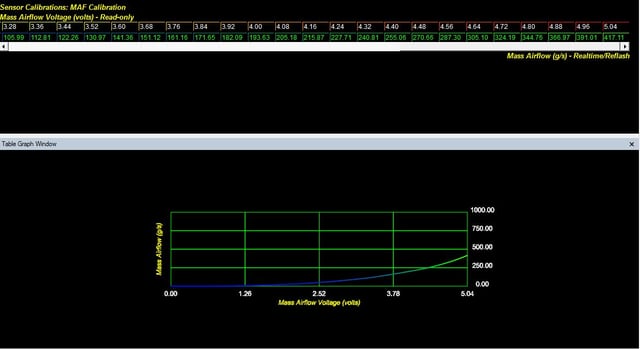
If you were to upgrade to a Cobb Big SF Intake on the same 2016 WRX, an additional 61.79g/s worth of airflow is now available.
This isn't really an issue on the stock turbo, however, it does become a problem when running a bigger turbo that is capable of maxing out the available airflow on the stock intake. When 5v worth of airflow is reached, the car will issue a cut to bring the airflow back down into a range it can read. At this point, the larger diameter intake is 100% necessary.
Efficiency:
Aside from planning ahead for the inevitable MAF cut, another reason for running a larger diameter intake is to help improve the efficiency of your turbo. Turbo efficiency is measured and detailed in a compressor map and is based off the turbo’s pressure ratio.
According to Turbo by Garrett, the Pressure Ratio of a turbo is defined by the Absolute outlet pressure divided by the Absolute inlet pressure.
The Absolute pressure at the compressor inlet is often less than ambient due to the intake system. This can be made worse at higher loads where the turbo is drawing in more air. This restriction will result in a pressure loss in the calculation for the pressure ratio. Let’s check out the math…
Pressure Ratio = PSIA (psig + Atmosphereic Pressure) / Atmospheric Pressure (14.7)
Let’s take a car that is running 20psig (gauge) at sea level. The Absolute pressure will be 34.7psia. In a “perfect world”, this turbo is operating at a pressure ratio of 2.36, but the world (including the intake system on any car) is not perfect, and these next examples will help illustrate why.
Example 1:
Let’s assume this car is running a restrictive stock intake and filter setup that creates a 2.0psig pressure loss (vacuum) at the compressor wheel. You must subtract this from the atmospheric pressure value in the denominator, and when you do the calculation again ((20psig + 14.7psia) / (-2psig + 14.7psia)), you come up with a pressure ratio of 2.73. This means that for the turbo to run 20psig, the turbo is working as hard as if it was running 25.5psig in a “perfect world”!

Example 2:
Now, let’s say we upgrade to a better flowing intake that is still stock size and reduces the negative pressure in the intake by .5psig. Running the calculation again ((20psig + 14.7psia) / (-1.5psig + 14.7psia)), we get a pressure ratio of 2.63. This has reduced the work load on the turbo by 1.6 psi and the turbo is now only working as hard as if it were pushing 23.9psig in our “perfect world”.
Example 3:
Finally, let’s say that we throw on a 4” intake with a really high flow filter. Now our negative pressure is only .75 psi. Running the calculation one last time ((20psig + 14.7psia) / (-0.75psig + 14.7psia)), we come up with a 2.49 pressure ratio. This means the turbo is working as if it were running 21.9psig in the “perfect world”. Now that the turbo isn’t having to overcome so much negative pressure at the compressor inlet, it is free to operate more efficiently with less adiabatic heating, and make more power.
Example 4:
Now, for funzies, let’s assume you have a forward facing turbo with big velocity stack on it pointing straight out the headlight, with no filter. Clearly, the restriction is removed and you are serious about power. What this does is allow you to have positive pressure at the inlet of the turbo when the car gets moving. This pressure goes up the faster you go, and this can extend the efficiency of the turbo out quite a bit. If this setup is creating just 3psig of positive pressure at the compressor inlet when the car gets moving, the math works out like this. ((20psig + 14.7psia) / (3psig + 14.7psia)) gives us a pressure ratio of 1.96. This means, in our “perfect world”, the turbo is only working as if it were pushing 14.1psig. This is how you can get away with pushing a smaller turbo outside of its efficiency range to get the benefits of faster spool while still extending the power band on the top side.

The Tuning:
As I’m sure you can guess, you cannot just go throw a 4” intake on your car and drive away. There will be some tuning that is absolutely necessary, even for the car to start and idle.
When tuning for a new MAF diameter, there is some quick math that will help get you started. You can get a global multiplier for the MAF Transfer Function by squaring the new intake diameter divided by the existing intake diameter (New intake Dia / Old Intake Dia)^2. The units used for the diameter don’t matter as long as both are the same (inches / inches or mm/mm). You then multiply the current MAF curve by this number to get a base map for the new intake.
For instance, going from a stock size intake on a Mazdaspeed 3 to a 4” intake, you would make the following calculation. We know that the stock diameter MAF housing is 66.5mm, and that 4” = 101.6mm. The inner diameter (ID) is what we are really looking for, so assuming a wall thickness of .085, this makes the ID 3.83” or 97.28mm. (97.28mm / 66.5mm)^2 = 2.14
The multiplier that you will apply to the entire MAF Transverse Function is 2.14. This will scale the airflow for each voltage up to a point where you will be able to get the car running. And once it is running you can use the fuel trims to fine tune the calibration and get the car dialed in for the new intake.
Intake size and design has a big effect on turbo efficiency, and can make it much easier, or much harder to get to your power goals. Make sure you consult with your tuner before you start throwing parts at your car and set some goals so that you don’t have to do the work twice. If you plan on running a bigger turbo in the future, go ahead and run a bigger intake on your stock turbo. It won’t hurt and it will save you from having to buy parts more than once.
Topics:


.jpg)


