.jpg?width=1024&height=681&name=Focus%20ST%20Engine%20Build%20Parts%20(13).jpg)
When you've finally decided to do an engine build on your Focus ST or other similar EcoBoost 2.0 turbo platform, it can be a little overwhelming once you've started looking for what you need. If all you care about is finding out what you need to bring to your machinist or whoever is assembling your motor, scroll to the bottom and you shall receive. If you're interested in what all this stuff is and checking out an engine tear down, read on.
There are many of components that most people never come in contact with or even know about. Many people resort to buying a full long block and doing a straight swap and never have anything to do with the process. There is absolutely nothing wrong with that. But a gearhead of any degree is always curious about their car, especially when it's something they've never worked on before. Whether you're the curious one, a "do-it-yourselfer", trying to save money (it might not be the cheaper route after all is said and done), or just want to understand how your engine works on a deeper level, this is for you. We're going to show you a handful of pictures and explain a few things about the engine as it's being torn down. We're going to show you all the parts we recommend when building a motor. We'll also discuss some concepts that you might not have thought about until reading this when it comes time to choose parts and get your engine machined.
The Long Block
.jpg?width=375&name=Focus%20ST%20Engine%20Build%20Parts%20(4).jpg)
.jpg?width=375&name=Focus%20ST%20Engine%20Build%20Parts%20(2).jpg)
The Focus ST long block (as with any long block) is technically a fully assembled engine that is properly timed and ready to be put into a car and started up. Some long blocks that you can purchase won't come with an oil pan or a valve cover but if you're taking an engine out of your car, you can be sure those are on there (at least I hope!).
We start with the valve cover removal which gives us clear access to the camshafts and a clear view of the timing chain and VVT actuators. After that, we start on the timing cover so we can start disassembling the timing components. Ultimately, this is what connects the crankshaft to the camshafts to spin together simultaneously at all times. You must remove the crank bolt and crank pulley first, which is not your standard bolt removal. It's on there....tight. A special tool to hold the pulley while removing the bolt with a breaker bar is necessary.
.jpg?width=375&name=Focus%20ST%20Engine%20Build%20Parts%20(7).jpg)
.jpg?width=375&name=Focus%20ST%20Engine%20Build%20Parts%20(9).jpg)
After removing the timing cover, all timing components need to be removed. We actually start by putting the crank pulley back on the end of the crank and tightening the crank bolt only enough so that we have some leverage to break loose the camshaft bolts and the oil pump gear bolt. Once those are loose, we can remove the pulley again and start to take everything off. At this point, it's a relatively simple process.
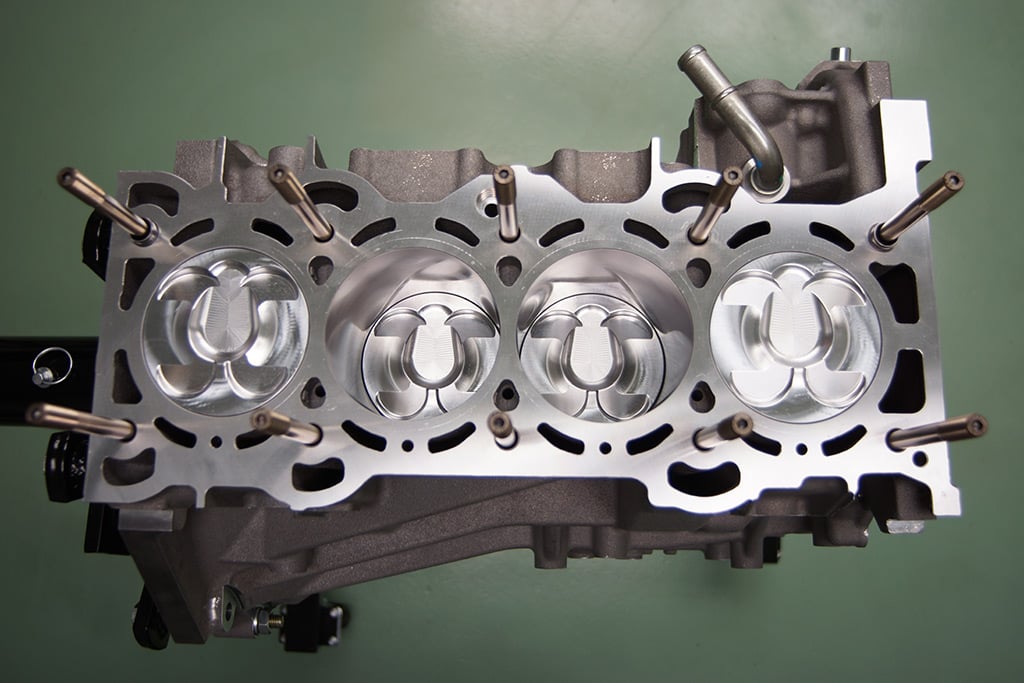
Once all timing components are off, we can begin working on the cylinder head. We have to start by removing the cam caps, carefully keeping them in the same position as they are removed and set aside. These will be put back on the engine before taking it to the machine shop. Then, we remove the camshafts to gain access to the head bolts. The head bolts are torqued very tightly as well, so a breaker bar and some elbow grease is used to break them loose. Then, the head gets taken off and set aside on a non-abrasive surface so we don't scratch or damage the surface that mates to the deck of the block. The MLS (multi-layer steel) head gasket does not get reused but you should still keep it for use at the machine shop when they assemble the deck plate to the block during machining. More on that later.
.jpg?width=1024&name=Focus%20ST%20Engine%20Build%20Parts%20(14).jpg)
.jpg?width=1024&name=Focus%20ST%20Engine%20Build%20Parts%20(15).jpg)
Now we remove the oil pan before rotating the engine upside down on the stand. We don't want any residual oil to fall back down through the engine and into the drip tray if it doesn't have to. After removing the oil pan, we can rotate the engine to start disassembling the lower rotating assembly. There will be more coolant and oil that still pour out. If it's a stock engine, it will have the balancer on the bottom of the crankshaft. Almost 100% of performance builds eliminate this entirely and plug the oil hole that lubricates the balancer with what's commonly known as a "balance shaft delete". Now we remove the engine girdle, which fastens the crank to the block. This is fastened by the main bolts which are the last set of bolts that are tightened more than your average. Then we take the rod bolts off, taking the 2 rod caps off that are rotated down (closer to you if the engine is upside down), then rotating the engine to bring the other 2 down. The pistons don't fall out of the motor very easily as they are held up by the tension on the piston rings expanding against the cylinder wall.
.jpg?width=375&name=Focus%20ST%20Engine%20Build%20Parts%20(18).jpg)
.jpg?width=375&name=Focus%20ST%20Engine%20Build%20Parts%20(20).jpg)
A Massive Speed Systems balance shaft delete kit (right) was already installed on this engine. On the left, the Massive oil pan baffle is installed. These are not factory components but happened to be in this motor already.
Once all rod caps are removed, the crank is lifted off and each piston and rod assembly is pushed out together through the top of the block. I always like to inspect the rod and main bearings as they can tell you a lot about what was happening inside the engine and often point to signs of any possible failure. The last remaining parts to remove are the 4 oil squirters.
Getting Ready to Build
Now that you know a little bit more about how it's assembled and what's being taken apart, here's what you need to know about putting it together.
- Reuse every bolt except for the head bolts, main bolts, and cam bolts. Although Ford doesn't list the cam bolts as a torque-to-yield, or stretch style bolt, I still like to replace those anyway since it's fastening a critical component on the engine.
- Pro tip: if you're disassembling your own engine, don't throw ANY bolts away until you know what you don't need to use any more. They are super expensive compared to regular hardware! Use plastic bags, label them with a sharpie, and store them in a safe location.
- Do not reuse the head gasket.
- Do not reuse any of the timing components including the chain.
- Do not reuse the oil pickup tube
- If you're rebuilding a block that had catastrophic damage, do not reuse any parts that circulate oil through them, like the oil pump or oil squirters. You may even want to replace the VVT actuators and solenoids if there was metal in the oil.
- Do not reuse any friction washers for the cam or crank bolts.
- Do not reuse bearings.
Here is the full list of parts that we recommend replacing, not including the pistons, rods, and bearings.
- Everything available in the Ford OEM gasket set which includes: vvt solenoid seals, valve cover gasket, valve seals, head to turbo exhaust gasket, intake manifold gaskets, throttle body gasket, vacuum pump gasket, water housing gasket, hpfp inner seal, turbo oil feed line washers, turbo oil drain line gaskets, turbo water line gaskets, water pump gasket, front oil seal, thermostat gasket, pcv gasket, oil filter housing gasket, and rear main seal. The gasket kit also includes head bolts and a head gasket which are commonly upgraded when building a performance motor. The head gasket is a fairly nice unit from the Ford so it's popular when rebuilding. But usually, ARP or other popular head stud kits can replace the factory head bolts.
- Crank pulley bolt
- Crank friction washers (2)
- Cam bolts (2)
- Cam friction washers (2)
- Timing chain guide
- Timing chain tensioner
- Timing chain tensioner guide
- Timing chain
- Oil pump
- Oil pump chain
- Oil pump chain tensioner
- Oil pickup tube
- Oil pickup tube gasket
- Oil pump gasket
- Main bolts or aftermarket main studs
In addition to this basic list, you need pistons, rods, and bearings. Although that isn't nearly as simple as picking out some generic parts, that should be the only other thing you need to build the short block (a long block minus the cylinder head, timing components, and covers). You'll need head studs/bolts to secure the head to the block while assembling the long block. Your machinist should be able to tell you what size bearings you need for the proper clearance. They will also be boring out your engine based on the pistons you bring them and if necessary, they can match up your set of rods and pistons by removing bits of material if they aren't close enough in weight already.
If you've gotten this far and you're actually moving forward with purchasing these items, you're most likely building the engine yourself or having an engine shop build it for you. At the very least, you'll still need an engine shop to do some machine work for you. Why machine work needs to be done and to what extent is a discussion for another day. But here is a list of things we recommend you get done. Talk to your machinist about these and make sure you know if they offer these services before you drop off your engine. There are many more options, all of which have to do with your budget and how quality your engine build can be. The every day performance car can easily get away with a solid, reliable build with at least these machining processes.
- Block cleaning
- Crack inspection
- Deck resurfacing
- Align bore and/or hone the main bore
- Bore and hone cylinders (see notes below)
- Clean, grind, and/or polish crankshaft journals
- Balance crankshaft (and possibly straighten if slightly bent)
- Rebuild the cylinder head
- Setting valve clearance
- Machining valve seats
- Recondition valves
- Installation of new valve seals and guides
One last thing to mention about machining, you need to bore and hone the cylinders while using a deck plate. If you don't, you're risking reliability and potential engine failure. Using a deck plate allows your cylinders to change shape (yes, they flex and change shape) as if the cylinder head was tightened down to it. If you don't use a deck plate when boring and honing the cylinders, your cylinders will be shaped perfectly only before the head is fastened down. Once the head goes on, the pressure will cause the cylinders to barely change shape, which will create an unfit cylinder shape for your pistons to move up and down in. This can quickly cause enough damage to render your new motor useless.
In my opinion, a performance build should not have very many compromises, if any. You're probably going to be generating more horsepower and torque. This means reliability is even more important than it was before because parts are being pushed closer to their limit. Replacing things like the water pump, thermostat, and any other various pieces can help your build be reliable after everything is put together. It might cost a few extra bucks now, but it might be significantly less than the damage caused by tired parts you tried to reuse on your built engine you spent thousands of hard-earned dollars on.
If you want to replace any other component mentioned or shown here, you're more than welcome to do that and we have them all listed on the site. As always, if you have any questions, we're able to help with whatever else you need. Just call, email, or message us using any of our channels!
Topics:

%20-%20Does%20Your%20Big%20Turbo%20Need%20It/EWGKit-web-(2).jpg?width=1018&height=449&name=EWGKit-web-(2).jpg)


.jpg?width=1024&height=299&name=Putting%20Down%20400whp%20In%20Your%20Focus%20ST%20(2.1).jpg)


.jpg)
